
 Bookmark
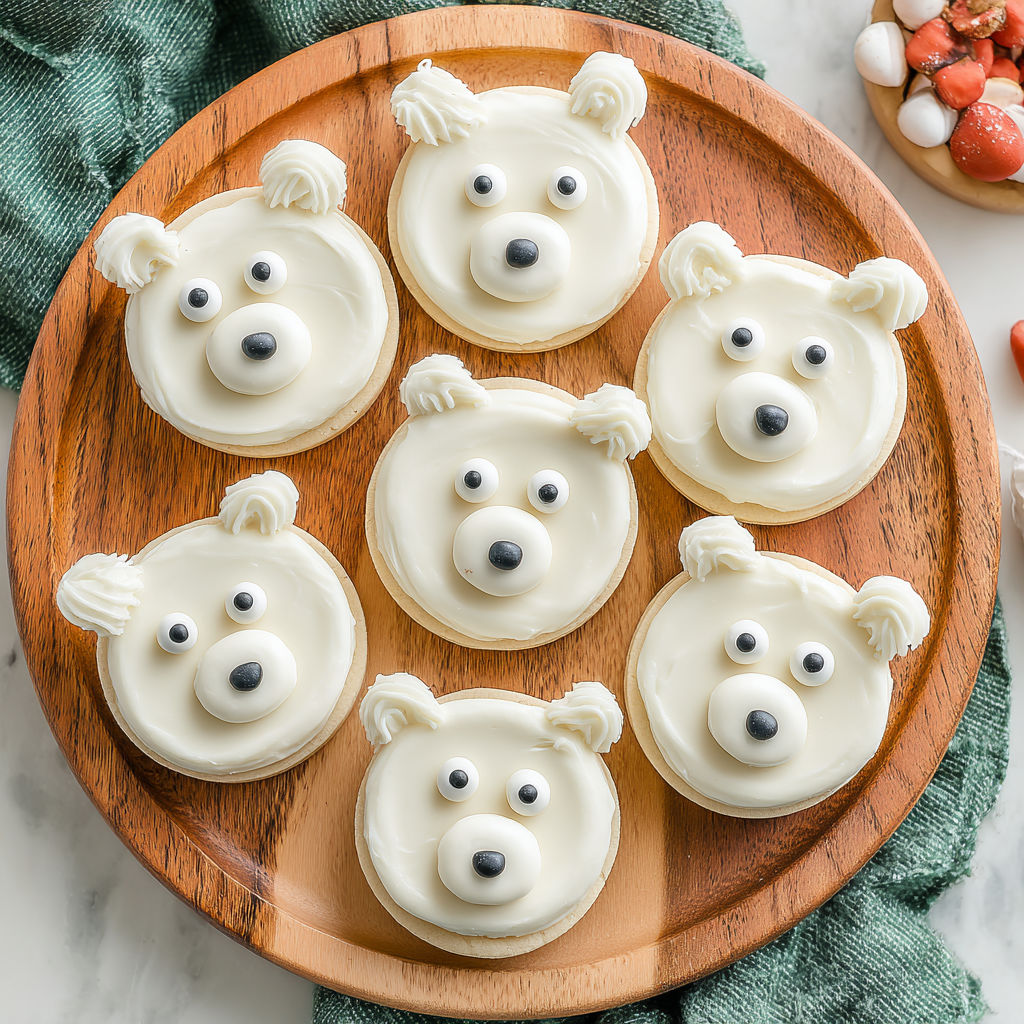
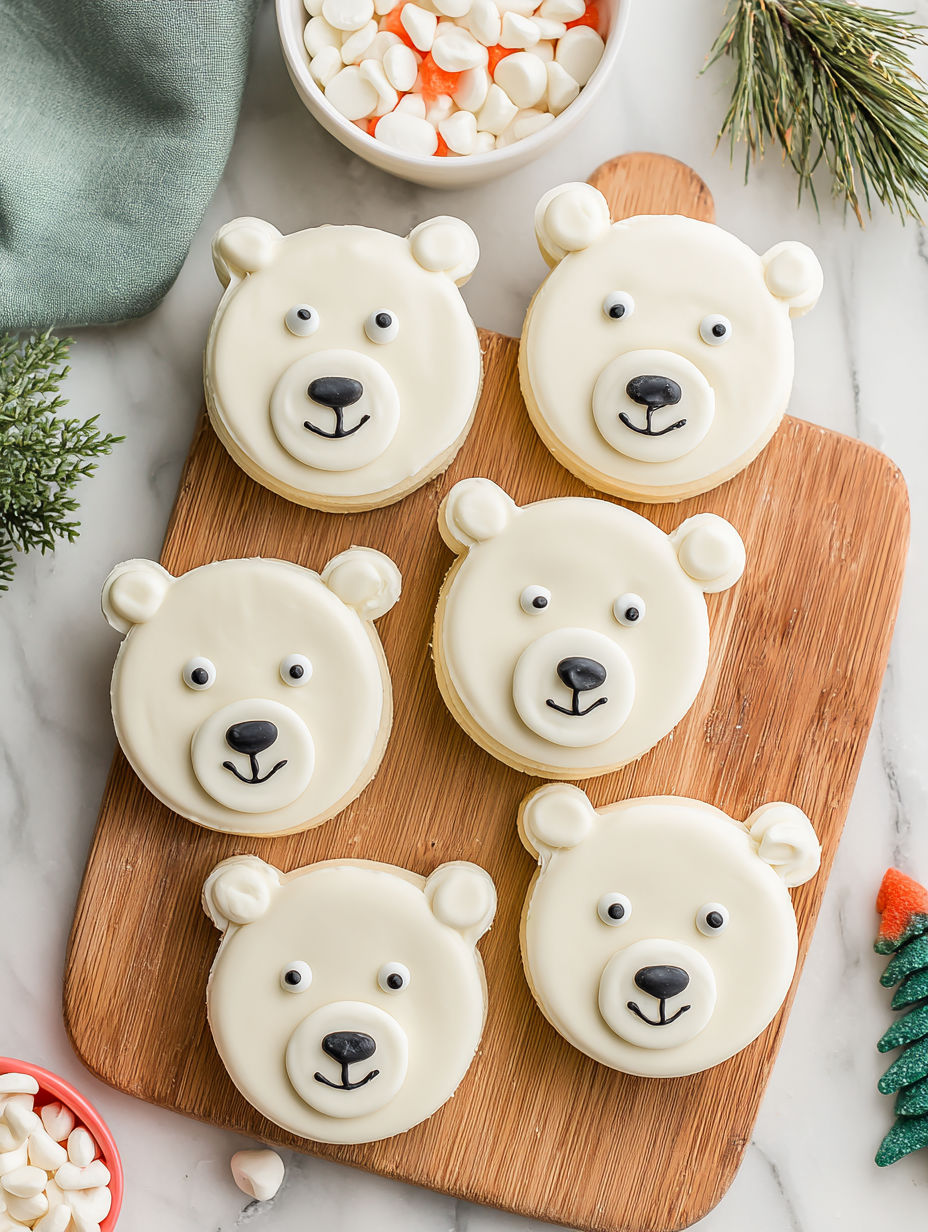
These Fun Polar Bear Oreos bring a playful and easy nobake dessert to your holiday table or any chilly afternoon gathering. They look impressive with their white coating, little ears, and cute candy eyes but come together with simple steps and minimal ingredients. Perfect for making memories with kids or just surprising friends with a festive yet straightforward treat.
I first made these during the holiday season last year and was amazed at how kids and adults alike loved decorating and eating them Just dipping the Oreos in candy melts is somehow satisfying and fun
Ingredients
- Oreos: Regular Oreo cookies provide that classic chocolate crunch and sweet filling Make sure to choose the ones with a sturdy cream so the candy coating sticks well
- White candy melts: These melt easily and harden with a smooth glossy finish Pick a high quality brand for consistent melting and better taste
- Candy eyeballs: Adds personality and charm to each bear You can find them in baking aisles or specialty stores Opt for a size that fits nicely on the cookie face for best effect
- Black cookie frosting: Use this for the nose detail A piping tip or a small squeeze tube makes it easier to create delicate lines
Instructions
- Spoon:
- Line a cookie sheet or cooling rack with parchment paper so the cookies wont stick while setting Take your time to cover the surface well
- Divide:
- Count out seventy two candy melts and split them into two groups of thirty six Set one group aside for later This prepares you for the ears making process
- Cut:
- Carefully cut each candy melt in the first group in half using a sharp knife These half pieces will serve as the cute little polar bear ears
- Melt:
- Place the remaining candy melts in a microwave safe bowl Heat them at half power for one minute Stir well Repeat heating at thirty second intervals stirring between each until the candy is smooth and completely melted Depending on your microwave it may take up to five minutes so dont rush the melting process
- Dip:
- Take a fork or candy dipper and dip each Oreo into the melted candy coating Fully cover the cookie Let excess drip back into the bowl before placing the coated cookie on the parchment Paper means easy cleanup and no sticking
- Assemble:
- While the candy coating is still soft promptly press a whole candy melt onto the lower half of the Oreo to form the snout Next gently add two candy eyeballs above the snout Then place the two candy halves on either side of the cookie to create the ears The timing here is key so work steadily
- Set:
- Let the decorated cookies sit uncovered for about ten minutes This allows the candy melts to harden and the shape to set perfectly
- Detail:
- Using the black cookie frosting pipe a small nose on each snout Be patient and go slow to make small precise dots
- Rest:
- Allow the cookies to rest at room temperature for another five minutes before serving This ensures the frosting dries and the cookies are ready to handle
Candy melts are my favorite ingredient in this recipe because they transform plain Oreos into whimsical polar bears in minutes The first time I made these I was with my niece who loved choosing the candy eyes and eager to place the ears Step by step it became a little holiday tradition for us
Storage Tips
Store your Fun Polar Bear Oreos in a single layer at room temperature in an airtight container This keeps the candy coating shiny and the cookies crisp Avoid stacking them to prevent breaking the ears
Ingredient Substitutions
If you cannot find candy eyeballs you can use small chocolate chips or edible marker dots to create the eyes For the black frosting try using melted chocolate or an edible gel pen for the nose detail
Serving Suggestions
Serve these as a whimsical dessert alongside hot chocolate or warm milk Their sweet crunch pairs beautifully with cozy drinks making them a perfect winter snack or party favor

Have fun decorating these little bears and enjoy serving them at your next gathering. Theyre simple to make and sure to bring smiles.
Your Recipe Questions Answered
- → How do I melt the candy coating properly?
Heat the candy melts in a microwave-safe bowl at 50% power in 30-second intervals, stirring after each, until smooth and fully melted to avoid burning.
- → What are the best tools to decorate the bears?
Use candy melts for ears and snout, candy eyeballs for eyes, and black cookie frosting to pipe small noses for detailed features.
- → Can I store these treats in advance?
Yes, keep them in an airtight container at room temperature for up to 3 days to maintain crispness and decoration quality.
- → What is the best way to prevent sticking during preparation?
Line your tray or cooling rack with parchment paper to keep coated cookies from sticking while setting.
- → Are these suitable for kids to help make?
Absolutely! Decorating offers a simple and fun project for children, especially during chilly afternoons or holiday gatherings.